A simple animation for all the objects within a group can be generated. Access the animation dialog from the overflow menu.
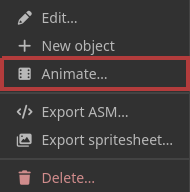
The option is not available if there are less than two objects in the group.
Your project is empty. Let‘s get started:
Start from where you left off previously or load a local file.

Start from scratch. Create a new graphics object and make some art.
Poke around an example project to learn how Antrax works.

Ctrl+S keyboard shortcut for savingCtrl+A) inside a text inputUndo/Redo overflow menu items update in real-time when a keyboard shortcut is usedlocalStorage every 10 seconds. An option to reload this saved state becomes available when the project is empty.8x7 and only allows colors viewable on the NES0 instead of 359Esc keyboard shortcut not deselecting if a modal was opened previouslyM)[0, 0] and goes into move draw mode with pasted content selected0-9 keyboard shortcuts to set zoom level-/_ and =/+ now increment/decrement the zoom level160B <-> 320C160A <-> 320A <-> 320DEsc when focused in an input will now hide popovers (but not de-select)0.1 granularity to zoom level, and manual text input by clicking on the magnifying glass in the bottom gutterCtrl+A) and De-select all (Ctrl+Shift+A)ellipse, ellipse-filled, select, rect, rect-filled and line draw modes0.5320BP/C keyboard shortcuts for focusing pixel/canvas width inputsColorPicker is now treated like a singleton which improves memory consumption by 10xX to open “Export ASM” modal (if supported by current object’s display mode)Shift+X to export active object as image320C ASM export (colors were in wrong order)Alt+Click/Middle-click to select color at pixeldisplayMode!=none
KCtrl is held (i.e. Ctrl+C now actually copies text instead of doing nothing)none having a maximum of 256)displayMode=nonenone)none: added BG320B: masks colors to palettes 0 or 4320C: was a placeholder, now it’s notnone is just free drawnonenonenone)0.5x, Shift+mousewheel goes in increments of 1x. New minimum of 1x.| Detail: | |||||
|---|---|---|---|---|---|
|
×
|
Objects: | ||||||
|---|---|---|---|---|---|---|---|
A simple animation for all the objects within a group can be generated. Access the animation dialog from the overflow menu.
The option is not available if there are less than two objects in the group.
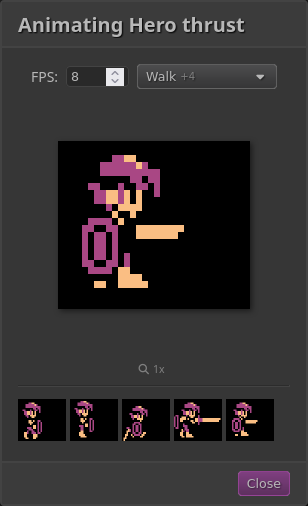
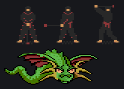
The animation dialog shows a preview of the animation, at the specified FPS. Each frame being animated is displayed underneath the animation in order. To adjust this ordering you can re-order the objects from the Main Sidebar.
The zoom level affects the animation and can be altered from this dialog.
The objects that are being animated can be filtered using the object picker.
The canvas is the thing in the middle of the screen that you draw on. Click and drag the mouse to draw. Ctrl+click to erase.
To pan the canvas, hold Shift+click and drag.
You can undo/redo drawing and resizing actions by finding the appropriate item in the overflow menu in the top gutter. Each object maintains their own undo stack.
There are many keyboard shortcuts for most common operations. Learning to use them will greatly speed up your work.
See the section on Editor Settings for info on zooming, showing the grid and adjusting the canvas size.
See the section on Draw Modes for info on drawing shapes, color filling, moving regions and more.
See the section on Selection Actions for how to flip, rotate, crop, and perform other actions against a selection.
There is limited supported for touch devices: enough that things kind of work but not so much that it‘s the ideal way of doing things.
Obviously keyboard shortcuts are going to be difficult, but there is a touchable UI to do most actions. For example, instead of Shift+click to pan there is a dedicated button to go into Pan mode where you don‘t need to hold down Shift.
Other things like undo/redo have a touchable UI in the Selection Actions overflow menu.
The menu item in an object‘s overflow menu launches a dialog that allows for export and import of the raw JSON representation for an object. Mostly, this is of little utility.
One use case is to paste this data into a different project that is open in a different browser tab, thereby copying an object from one project to another. This requires the target object to be the same size and the display modes to match among other things.
Note that actual colors are not part of the data so the target‘s color palette may need to be adjusted.
The format of the JSON data is simply an array of arrays
representing the rows and columns of the
pixel data. Each array item
is an object containing a modeColorIndex key
that specifies the zero-based index into the array of
available colors for the object.
A null value indicates the absence of any color data
and the pixel should not
be colored (which may equate to either transparent
or the background color
depending on the
uncolored
pixel behavior setting).
Each object has a display mode which can alter certain available options, like pixel dimensions, canvas dimensions, and available colors.
The term display mode comes from the Atari 7800 graphics engine MARIA, which has several different display modes that offer different ways of rendering graphics, from providing different color combinations to allowing larger screen resolutions.
| Mode | Colors (total) | Width multiple | Max width |
|---|---|---|---|
| None | 26 (16.7m) | 1 | 256 |
| NES | 26 (64) | 1 | 128 |
| PICO-8 | 26 (16) | 1 | 128 |
| 160A | 4 (256) | 4 | 128 |
| 160B | 13 (256) | 2 | 64 |
| 320A | 4 (256) | 4 | 128 |
| 320B | 16 (256) | 2 | 64 |
| 320C | 13 (256) | 2 | 64 |
| 320D | 4 (256) | 4 | 128 |
Note that switching between display modes will alter the palette colors. Since not all colors are supported in each display mode, the closest available color (according to CIELAB Euclidean distance) will be chosen as a replacement. Since multiple objects can share a palette set this might affect the appearance of them in an unexpected and/or undesirable way.
The recommendation is to not share palette set among objects with display modes that have different color restrictions.
The none display mode is the default and behaves
like you would expect. There are no limitations on colors, dimensions,
or anything else (beyond what Antrax itself
supports).
This forces the
pixel dimensions
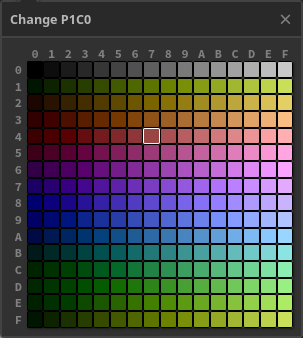
to be 8×7
and restricts the palette to the 64 colors the NES supports.
Although, it‘s more like 55 colors since there are 10 versions
of black.
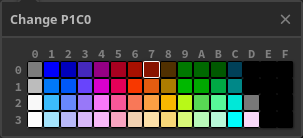
This restricts the colors to the 16 that the PICO-8 allows, plus the 16 “hidden” colors. No other restrictions are applied.
These modes force the
pixel dimensions
to be 12×7. The
canvas width is clamped
to certain multiples and has a maximum width
based on how many bytes of graphics data each
pixel requires.
These modes all have similar restrictions to the 160 modes, with a few extra caveats.
The "320" display modes offer twice the resolution by effectively splitting each pixel in half, thus allowing two colors per 160-sized pixel. This comes at the cost of being very confusing, not allowing partial transparency, and being much more difficult to visualize. These modes are the biggest reason Antrax exists.
Their bitwise presentation is also incredibly confusing so it‘s much easier to have a tool generate the graphics data for you in lieu of doing it by hand.
The reason they‘re called “320” is because the resolution is doubled. However, I find that an incredibly confusing way of thinking about it, as you cannot draw twice as many pixels, the pixels are just now rendered differently. Internally, Antrax treats these double-resolution “pixels” as a single pixel with multiple colors. This makes visualizing what you‘re actually allowed to do in these modes much easier instead of treating each color as a single pixel.
For example, MARIA doesn‘t allow drawing one 320 “pixel” at an odd horizontal offset, because you can only draw them in pairs, and they must all align. So basically each 320 “pixel” is really a 160 “pixel” with (potentially) two different colors.
Thinking about these modes in this way can help internalize how the graphics engine actually works and not get caught up in how much "resolution" you are gaining or losing for each display mode: they simply render the same sized pixels in a different manner.
The editor is “modal”, in that the context of how to interact with the canvas changes depending on which draw mode is active.
There is a button to switch between each mode located in the Canvas Sidebar.
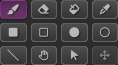
This is the default draw mode. When you click on the canvas the active color will be applied to the pixel.
Fills all (cardinally) adjacent pixels that match the current pixel‘s color with the active color.
Erases the pixel. Either draws transparent or the current background color depending on the state of the uncolored pixel behavior toggle.
Sets the active color to the color of the current pixel.
Click+drag to draw a shape.
Click+drag to draw a single-pixel-width line.
Click+drag to move the canvas around. If things get out of control you can return the canvas to its original position by clicking on the icon in the top gutter.
Click+drag to select a region of the canvas. This region can then be moved or otherwise acted upon.
Click+drag to move the selected region. This mode is only available when a region has been selected.
The moved pixels will not be “committed” to the canvas until de-selected.
These are some knobs to turn to tweak the behavior of the editor.
The width and height in onscreen pixels of each
object‘s
pixel. In general,
this should just be the aspect ratio of the pixels
when they are rendered by the actual hardware, e.g.
12×7 for the Atari 7800.
Certain display modes lock the pixel dimensions and they cannot be altered.
The width and height in pixels of the active object.
Certain display modes restrict the widths that are allowed. The input controls will not allow you to set a width that is invalid, and will revert it to the nearest valid value.
The grid outlines each pixel on the canvas. It will not show up anywhere else (e.g. during image export or animation).

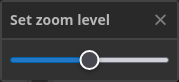
The canvas can be magnified or diminished by some preset values, ranging from 0.125x to 8x. This affects image export and animation.
Uncolored pixels show up as a checkerboard pattern by default. This can be changed so that they appear as the active palette set‘s background color instead.
Note that this option is affected by (see below).
is an Atari 7800 oddity that replaces transparent pixels (or partial pixels) with the background color. This means that all objects will actually render as rectangular.
This is most noticeable and/or useful in the 320B display mode, where three extra colors are revealed that make use of the first color in either palette 0 or palette 4.
If is enabled, then the uncolored pixel behavior (see above) is forcefully changed to show the background color.
If the
display mode
is set to
none,
then
is
forcefully toggled off and the controls are disabled.
Objects in certain display modes can be exported to Assembly suitable for the Atari 7800. This code can be directly integrated into the rest of the game code.
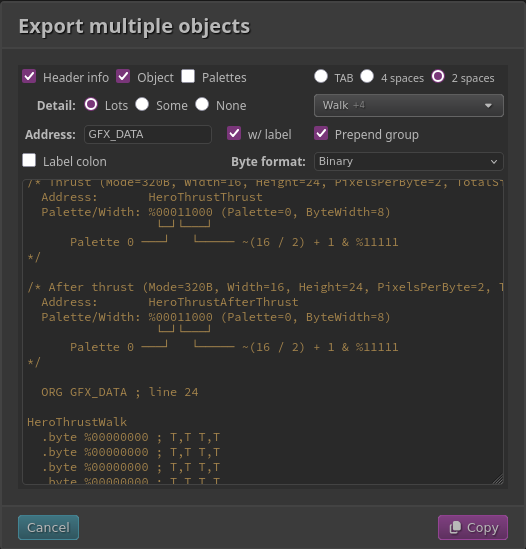
There are a handful of options to tweak the generated code to your liking.
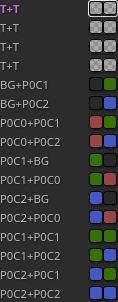
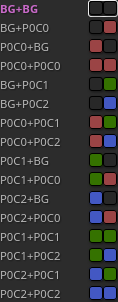
The three checkboxes at the top let you choose what to export.
“Header info” provides information needed for the display list entry. Since this can be kind of confusing, it also includes a small explanation of the bit values (depending on the level of detail that is selected, see below).
“Object” generates the instructions for the actual graphics byte data.
“Palettes” exports a comment with the color data for all relevant palette sets.
“TAB”, “4 spaces”, and “2 spaces” control how code is indented.
If you desire a different indentation than those three options, keep that to yourself. Gross.
“Detail” provides control over how much extra annotation is displayed in the comments.
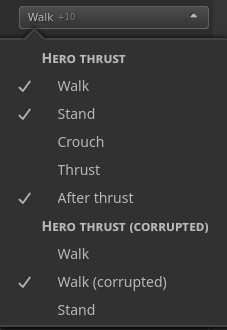
The object filter is a dropdown that lets you filter which objects are being exported. This is most useful when exporting a group or the entire project.
This control is not shown when only a single object is being exported.
If the sum of the widths of all the objects exceeds 256 bytes then a warning will be displayed. You can use the object filter to omit objects until you‘re under the limit.

“Address” lets you set the byte offset
where the graphics data will be written. If the
value is prefixed with $ it will be
interpreted as hexadecimal; % as binary;
otherwise decimal. In the generated code it
is always shown as hexadecimal.
If “w/ label” is checked, then the value
is instead interpreted as a label, and each line
will add 256 to the label. So, if “Address”
is set to MY_DATA and “w/ label”
is checked, the first block will be written to
the address MY_DATA, the next will be
written to MY_DATA + $100, and so on.
If checked, the group name will be added as a prefix to each object‘s label.
For example, if the group
is named “foo” and the object
is named “bar”, the label by default will
be Bar (converted to PascalCase). If this option
is checked it will be FooBar.
If checked, a colon (:) will be added to the end of all
labels.
Byte values (.byte xxx) will be formatted
according to the specified radix.
Objects can be exported as images. Groups and projects can be exported as spritesheets.
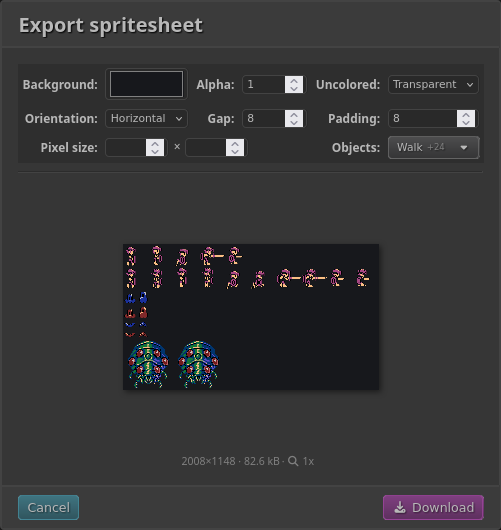
The “Background” and “Alpha” options let you specify a background color for the exported image.
“Uncolored” refers to uncolored pixels. Transparent means they will be transparent, Default means they will use the current setting of uncolored pixel behavior.
When exporting multiple objects, they will be grouped by their group and arranged in rows (Horizontal) or columns (Vertical).
This option is not available when exporting a single object.
“Gap” controls the whitespace between each object, while “Padding” controls the whitespace around the edges of the entire image.
“Gap” is not available when exporting a single object.
This allows you to alter the pixel size of the exported image. This setting applies to all objects that are being exported.
This setting can be useful if the object has non-square pixels but you want the exported image to use square pixels.
Note that for the 320
display modes, if you want
a truly square pixel, you most likely want to use a 2:1 ratio for the
pixel size (e.g. 8×4).
Similar to the ASM export you can filter the objects that will be exported.
This control is not available when exporting a single object.
The zoom level affects the appearance of the exported objects. The current zoom level can be adjusted from this dialog by clicking on the icon.
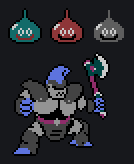
Colors are organized into palettes, which are organized into palette sets.
Each palette has three colors, and each palette set has eight palettes in addition to a background color. This mimics the way colors are handled by the Atari 7800.
In the UI, colors are identified by
their palette name and their color name
(e.g. P3C1 for the second color in the fourth palette).

Palette sets can be viewed and managed in the Top Gutter. The palette set for the active object will be shown, and other palette sets are revealed in a dropdown.
Each object has an assigned palette set, that dictates which colors are available for drawing. The available colors will be shown in the Canvas Sidebar.
Palette sets can be renamed or deleted by clicking the overflow menu in the dropdown. A palette set can only be deleted if it is not assigned to any objects.
Palette sets also contain a background color, which has significance for the Atari 7800 display modes, and also affects the behavior of the uncolored pixel behavior.
The eight palettes are named P0–P7.
The palette(s) that contains the active color
will be highlighted.
Each palette contains three colors, referred to as
C0, C1, and C2.
Click on a color swatch
to reveal the color picker and choose a new color. The color
picker UI will change depending
on the active object‘s
display mode.
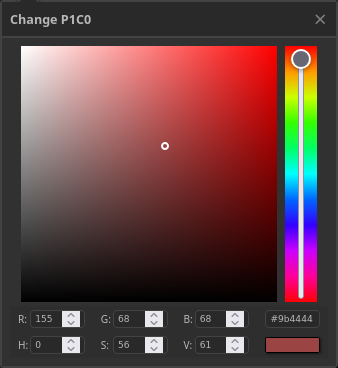
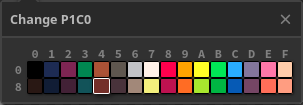
When a new color is picked, all usages of that color will immediately be updated around the UI.
When you start working on something a project is created for you. The project is merely a way of organizing all of your graphics into a single item that can be saved to an external file and loaded at a later time.
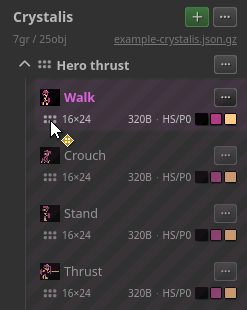
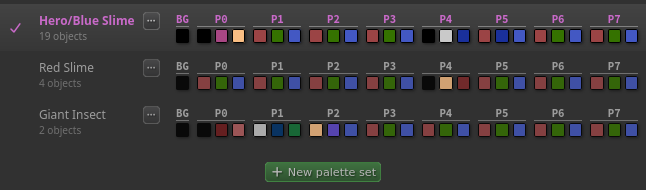
The project can be viewed in the Main Sidebar.
One project can be open at a time. Each project can contain multiple groups and each group can contain multiple objects.
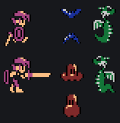
Groups are meant as a way to manage similar graphics objects, e.g. each frame of an animated sprite. They offer a convenient way of exporting multiple objects into various formats, such as Assembly or a spritesheet.
All three levels of the hierarchy can be renamed via the option of the overflow menu.
When animating objects, the order of the frames is dictated by the order of the objects in the group. You can modify this ordering by dragging the object around by its .
Objects can also be moved to a different group using the same mechanism.
Groups can be re-ordered in the same way, although it might help to collapse each of them first. The ordering of groups affects the order in which they appear when exporting a spritesheet.
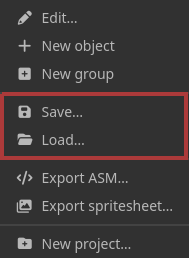
A project can be saved to an external file and loaded later. The external file is specifically gzipped JSON, and is an overly verbose representation of the current editor state. Some things like the undo stack are not represented in the saved file, so will not be preserved after loading.
To save or load a project click on the or items in the project‘s overflow menu.
You can choose a name when saving the file, although depending on your browser settings, it may not prompt you for a file location. So if there is an existing file the browser may add a unique suffix irrespective of what name you specify.
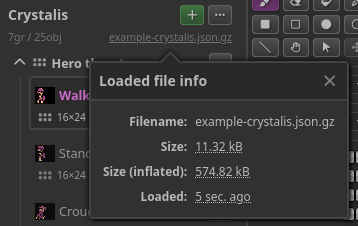
Details about a loaded file will appear underneath the
project name in the
Canvas Sidebar.
If an autosaved (see below) project is loaded the filename
will be set to localStorage.
The current project is automatically saved locally in the browser every 10 seconds. You can manually trigger this by pressing the icon next to the project name in the Main Sidebar.
The autosaved project can be restored from the empty project splash screen.
Once you have something selected, you can perform a number of different actions against that selection. These actions are displayed in a small toolbar in the Top Gutter.

By default, all selection actions are disabled, but each button will become enabled once it‘s possible to take that action.
Copy will store the contents of the current selection for later use. The contents are de-referenced, meaning that even if the underlying pixels change, what‘s in the copy buffer will not.
Once you have something copied,
it can now be pasted onto any
other object, as long as the
display modes are the same. The
previously copied
pixels will appear at [0,0] on the
canvas. This new data will
be selected
and the draw mode
will be set to move.
Crop‘s the canvas to the current selection. If the display mode does not allow that exact width, the next largest valid width will be used.
Erases the selection.
Reflects each pixel horizontally or vertically. These two actions can be executed even if nothing is selected. In that case the entire canvas will be flipped.
A horizontal flip is not valid for display modes that have multicolored pixels and do not have the corresponding reflected color.
For example, if a pixel is colored there must be a corresponding color in order to flip horizontally.
Rotates the entire canvas 90° counter-clockwise. This only operates on the entire canvas, the selection is ignored. Note that the canvas may be resized!
This has limited utility, particularly when the pixels are not square. However, it‘s kinda fun.
If you want to rotate clockwise, press the button three times. And stop complaining.
Some less-used actions are hidden in the overflow menu.
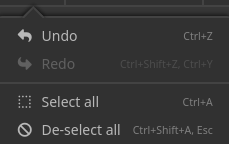
Explicit items for Undo and Redo live here, which is handy if you're on a device without a keyboard.
Similarly, explicit items for Select All and De-select All can be found here as well.
The Antrax editor is made up of several components: the Main Sidebar, the Main Header, the Canvas Area, the Canvas Sidebar, the Top Gutter, and the Bottom Gutter.
The main header shows the currently active Palette Set and all of its Palettes. Click on a color swatch to reveal the color picker. When you choose a new color it will be propagated immediately around the UI.
You can reveal the palette set management UI by clicking on the name. From this dropdown you can change the name or assign a different palette set to the active object.
Palette sets can only be deleted if they are not in use.
This is where all the drawing happens. If the project is empty, some example projects will be shown here instead.
This sidebar shows information about the currently active object. You can switch between different draw modes, re-assign a palette to the active object, switch to a different display mode, or change the active color.
Palettes and
display modes
are intertwined, in that assigning a
palette to an
object is only relevant for the Atari 7800
display modes.
When the
display mode is
none,
the UI for selecting a
palette disappears.
For display modes that have an equal number of colors available to them, you can switch between them at will. Otherwise, the canvas must be clear to switch to a different display mode.
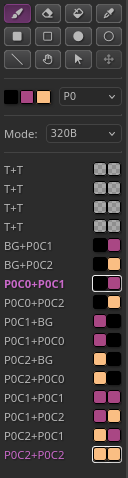
The colors that are available to draw with are displayed in a list. Click on a color row to begin drawing with that color.
In certain display modes, pixels can contain more than one color. In those cases, each color will be shown in each color row.
The top gutter is above the canvas area and contains information and actions relevant to the active object.

The first section contains selection actions: things you can do once something is selected. It also contains an overflow menu containing less directly used actions.
The second section is a breadcrumb indicating the active group and active object.
The third section contains positional information:
The bottom gutter is below the Canvas Area and contains information and actions relevant to the global editor state.

The first section contains Antrax-specific informational links:
The second section contains inputs for altering the dimensions of pixels and the canvas. For certain display modes these values are either locked to a certain size or clamped to certain multiples.
The third section has miscellaneous settings that alter the canvas view:
Antrax was built by Tommy Montgomery in late 2025. It is completely client-side and is written in TypeScript. It was written from scratch and completely free of client-side dependencies.
A great deal of testing and guidance was provided by Bob Montgomery.
The name Antrax is a portmanteau of “Ant” and “Contra”. The “X” is for the culture.
The gradient in Antrax is meant to resemble the gradient in the Atari 7800 logo. I know it‘s obnoxious but I like it.
Antrax uses the fonts Source Code Pro and Noto Sans, both licensed under the SIL Open Font License.
Icons are from the FontAwesome free icon set, licensed under SIL Open Font License 1.1.
Extensive use of the 7800 software guide and Graphics Mode documentation was used to achieve almost everything related to the 7800.
v1.1.0f0ad067dc54938792f1ec2cb60118c1aef27bae5